Installation Guide for Raspbian
Raspbian, one of the OS’es especially optimized for Raspberry Pi boards (Pi) has the most recommendations and support from the RPi community, while providing rich functionality and robustness in limited resources of Pi. Debian based, it offers, in addition to the basic functions of the kernel, over 30,000 applications, packages, pre-compiled software, all put together to be easy to install and use on the Pi.
This guide is presented for embedded applications or servers remotely managed where’s no need for local display, keyboard or mouse attached to the Pi, and hence no graphical interface.
What do we need?
- Raspberry Pi 1 or 2
- Micro USB and ethernet cables
- Router able to allocate IP addresses through DHCP, connected to the internet
- Power supply for RPi (any charger with USB output)
- SD or micro SD card (4 GB minimum)
- Image Raspbian
- 7zip – file unpacker
- Software for writing images on the SD card – Win32 Disk Imager
- SSH client – putty
- Laptop or desktop with Windows, Linux or Mac OS
How to put Raspbian on the SD card?
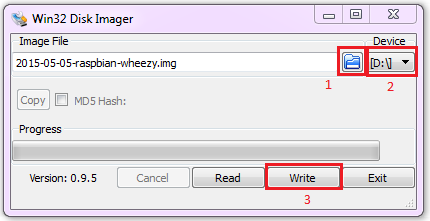
Assuming we use Windows as the operating system, after downloading the Raspbian image and extracting it from the archive with 7zip, use the Win32 Disk Imager to write it on the SD card.
If the card drive letter does not appear in the list, try to start Win32 Disk Imager using Run as Administrator or use an external USB card reader.

Be careful to the selected drive letter in the Win32 Disk Imager and to the data on the card because it will be lost forever!
If we press the “Read” button by mistake, the .img file will be corrupted! Even if quickly press “Cancel” the .img will be altered, thus, the recommendation is to stop Win32 Disk Imager, delete the corrupted .img file and extract it again from the archive.
After we press “Write”, Win32 Disk Imager will ask for confirmation.

Press “Yes” if we are sure that we have chosen the correct drive.


After finishing the writing, mandatory use the eject function of your operating system before extracting the card from the reader.
For more detailed information, in particular for other operating systems (Linux, Mac OS) find more here: installation.
Initial configuration of Raspbian
Insert the SD card into the Pi, power-up, connect it via ethernet to a router (it must give IPs via DHCP and be connected to the Internet), then connect to the Pi with putty (pi user, password raspberry).
Via SSH type the following commands to get administrator rights and start the raspi-config:
sudo su
raspi-config
Then, raspi-config is open and we go to the following sections:
“1 Expand Filesystem” – option needed to use the entire space on the card, regardless of its size
“2 Change User Password” and change the password (for user pi)
“7 Overclock” – this step is optional – we can choose “Modest” or “Medium”
“8 Advanced Options” and choose:
“A2 Hostname” – a name that corresponds to the plate (ex. RPI-spray–of–flowers)
“A3 Memory Split” – choose 16 MB
“A0 Update” – we have to wait a few minutes for updating
Do not play with the “A4 SSH” because you risk losing the remote connection and will need either to put local keyboard and display or to reinstall the image on the card.
After exit of the raspi-config, do a general update:
apt-get update
apt-get upgrade
apt-get dist-upgrade
Once the updates are done, do a restart:
reboot


